Maps

Mount Shuksan via The North Face, White Salmon, and NE Ridge

The North Face of Shuksan with the route of our ascent overlaid on Google Earth

On August 3, 4, 5, 2021 I got to climb the North Face of Shuksan via the Fisher Chimneys down the White Salmon Glacier up the North Face then up the Northeast Ridge of the Summit Pyramid. Our descent was via Hell’s Highway, Winnie’s Slide and Fisher Chimneys.  This was a three day trip and we were a party of four climbing in two rope teams. We bivied at the base of the North Face and at the base of the Summit Pyramid on the Sulfide Glacier. During the trip I ran a track each day and ran that data through the Track Parser App I have developed. You can use the Track Parser for free here Track Parser App

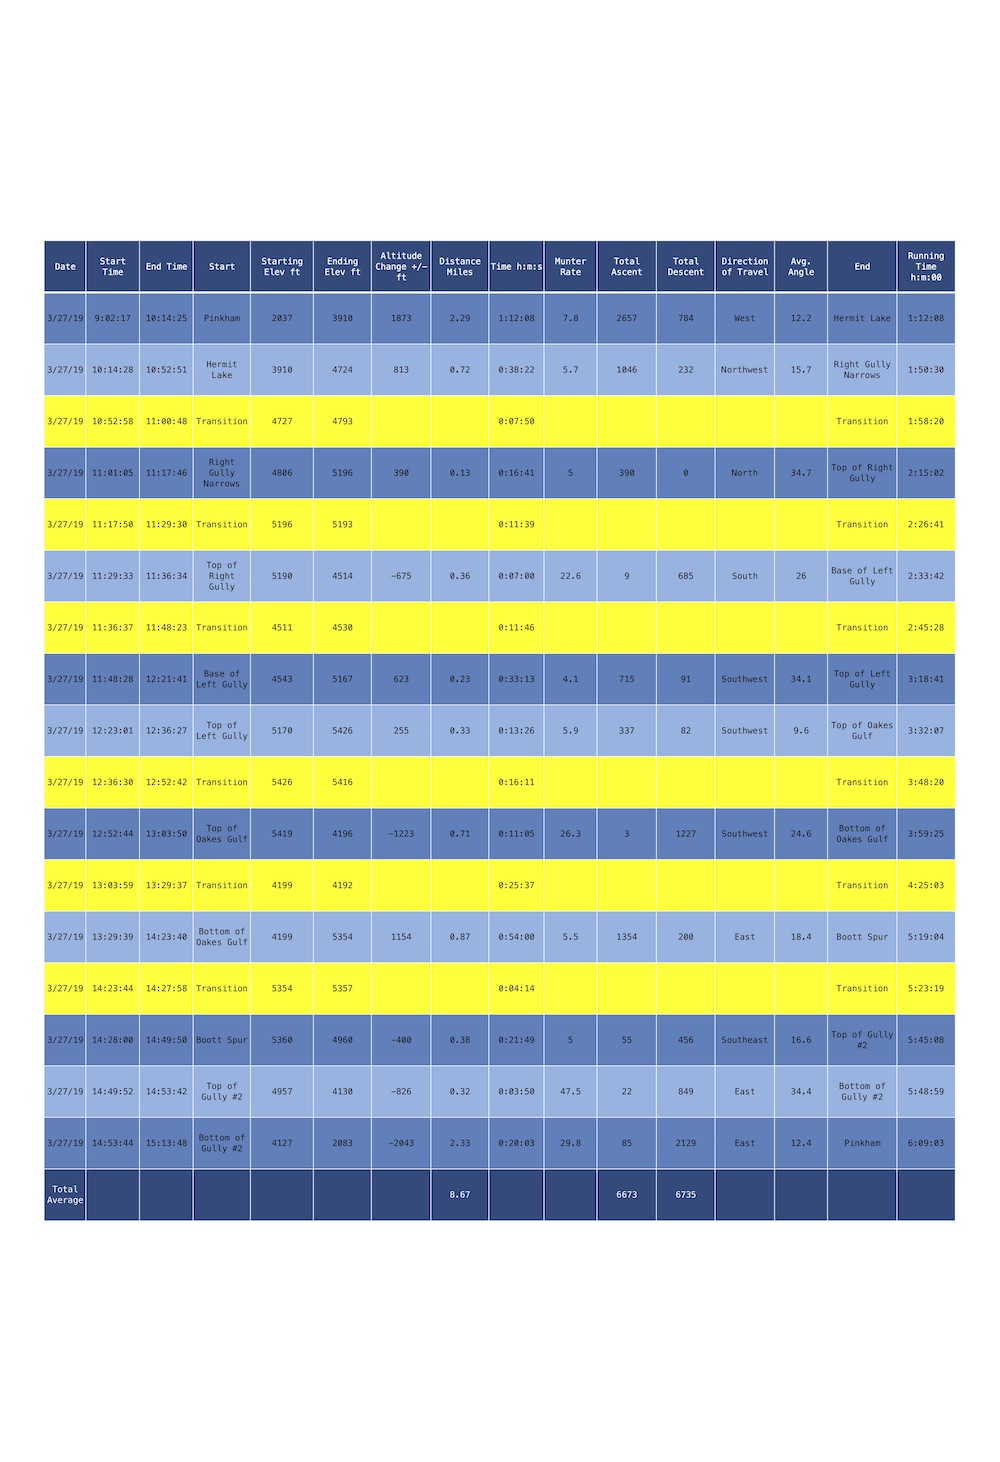
The Track Parser gives you 4 data files: A .csv file, an .html file, a .geojson file, and an .xlxs file. The .html file gives you an interactive mph map that is very useful for mountain bikers, skiers, and runners but not very useful for alpine climbs so it has not been included here. The .csv is only useful for those who can manipulate that data and if you can do that you can get the .csv data from the .xlxs file albeit with one more step, so for simplicity and less confusion I have not included it.

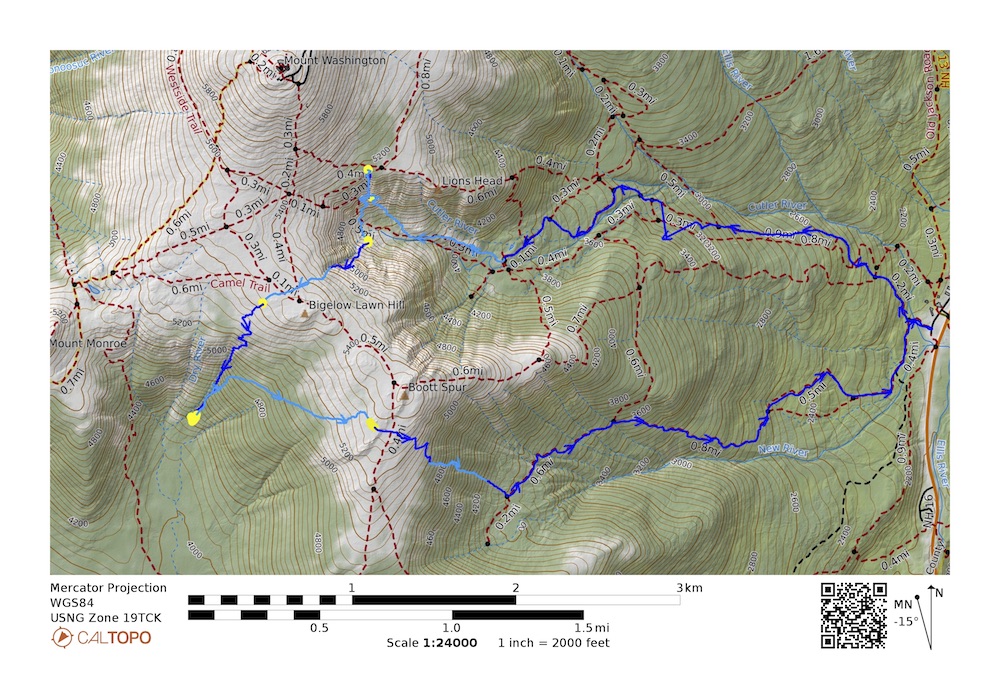
What I have included for each day is the Geojson file that when uploaded into Caltopo you get an interactive map with each leg color coded in sync with the row colors of the .xlxs file, a .kml file that will open in Google Earth and give you the data as well in that program. I have also included links to already built Caltopo maps with the data but they are “read” only, though you can export the data from them. There is also the Excel files (.xlxs file) and an overview Geopdf map that will import into Avenza.

I hope you enjoy the data and find it useful.

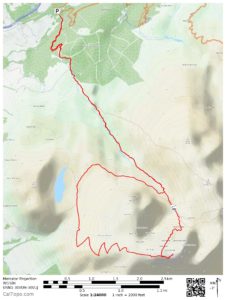
Click the photo or the link below for the Geopdf

Overview Geopdf 

Day 1 Data

Day 1 Shuksan KML
Day 1 Shuksan Geojson
Day 1 xlxs
Caltopo Read Only Map Day 1 
https://caltopo.com/m/D4A5N

Day 2 Data

Day 2 Shuksan KML
Day 2 Shuksan Geojson
Day 2 xlxs
Caltopo Read Only Map Day 2 
https://caltopo.com/m/0H4DT

Day 3 Data

Day 3 Shuksan KML
Day 3 Shuksan Geojson
Day 3 xlxs
Caltopo Read Only Map Day 3 
https://caltopo.com/m/0JBDU


Posted by Marc Chauvin in Maps, Mountain Biking

Three Ravine Tour: Skiing in Tuckerman Ravine, Oakes Gulf, and Gulf of Slides

Click on the map to download large geopdf

I was going through some old tracks and found a track from a trip I did in March 2019. This is a pretty classic tour for me to do. The day I did this tour the avalanche hazard was low. You can see the archived forecast for the day here. The day ended up warmer than forecasted with temperatures getting above freezing at the altitude of the ravines, you can get that info from the next days forecast here.

Click on the picture to download the data

Because of the program I developed I was able to reverse engineer the route plan with the actual times and other data. On this tour I wasn’t going for a record time, it was just a good solid pace with a few breaks as you’ll see in the data. I say this so you can calibrate the information for your pace and adjust as you see fit, either planning a faster or slower pace.

The map and the data are color coded so that you can visualize each leg. The yellow areas are the transitions. Below you will find the GPS track as a .gpx file and .kml, the data as a .csv. For the map and a PDF of the data just click the photos or there are also links below.

3-27-19 GeoPDF Map
3-27-19 Data
3-27-19 csv
3-27-19 kml
3-27-19 gpx (Some browsers add a .xml extension, delete the .xml leaving only the .gpx extension before saving)

Posted by Marc Chauvin in Maps, Mountain Biking

Moab MTB, Whole Enchilada and Slickrock

Click to get Geo-PDF Map

On October 14 and 15, 2020 I got to ride two of Moab’s classic trails The Whole Enchilada and Slickrock. I found these trails very different from each other and unique compared to trails I have ridden in other areas.. The WE was a long trail/ride that went from over 11,000 feet to the Colorado River at around 4000 feet so it rode through a variety of climatic zones. Slickrock on the other hand was all on sandstone with very little vegetation.

The WE was a long ride, about 27 miles but I got dropped off 2.5 miles from the trailhead on Geyser Pass Road and rode the 3 miles from the endpoint at Grandstaff Campground to Lion’s Park in Moab adding over 5 miles to the ride.

Click for a PDF of the data

I found the WE to be a good ride but anything that long can’t be fantastic the whole way.  My favorite parts were in the top half,  from the trailhead to the crossing of the LaSal Loop Road. The climb to Burro Pass was really good and I was able to ride most of it. As I got to the pass there was a group hanging out and all I saw was the trail going up Manns Peak. You’ll notice that I went up a bit that way and figured out I blew the navigation.

The descent from the pass reminded me of home a bit. The best part of the decent though was the Hazard County Trail. The up was short but sweet and the down was fast and with good flow that I appreciated since the area is so dry it makes things a bit slippery.

The second half was more desert like and good but not my particular favorite but it was as expected. I will say that when looked at as an entire ride it is an awesome link up that I am really glad I got to do.

I rode the Slickrock Trail the next day. I didn’t know there was a fee to get into the county park it is located in so I am mentioning it here, it was $5.00 for the day so it isn’t expensive.

Click to get Geo-PDF Map

I found out after the fact that the recommended way to ride it is clockwise but I had ridden it counterclockwise. Honestly it seemed like they would be about the same. This was a fun quick ride that I enjoyed. It is very different from what I am use to and the friction of the tires on the rock allowed you to climb nice steep hills which was cool. I will say though that riding this trails wouldn’t prepare you really for the WE, to me they seemed very different in style and flavor.

Click for a PDF of the data

You can click the maps and data above to get a PDF of those. Below are links for those and the GPX and KML files as well. I hope you find this info useful.

WE Map
WE Data
Slickrock Map
Slickrock Data
WE gpx (Some browsers add a .xml extension, delete the .xml leaving only the .gpx extension before saving)
WE kml
Slickrock gpx (Some browsers add a .xml extension, delete the .xml leaving only the .gpx extension before saving)
Slickrock kml

Posted by Marc Chauvin in Maps, Mountain Biking

West Side NoCo Mountain Bike Ride

On June 22, 2020 I had an appointment to get my car fixed so I planned a bike ride from the garage. I wanted it to take a good portion of the day so I wouldn’t have to wait for the car to get fixed. What I ended up with is a 25.13 mile ride with 3.01 miles being on pavement, 3.36 miles on gravel rd and 18.73 miles of single track.  I was trying to do as much single track as possible but I was also trying to avoid repeating sections of trail. I didn’t work very hard to plan a route since I knew the area pretty well so I might have done a little better with more precise planning. I ended up repeating about 2.2 miles of single track (mostly the trail Lager in the Marshall Conservation Area) and .37 miles of gravel road. I worked out these stats to give you an idea of how extensive the trails are in the Mount Washington Valley. Considering this is only one side of the valley and the other side (East) has as many or more trails and is arguably more popular you can see there is a lot of riding here. There was virtually no sections that I had to hike my bike (no more than 20-50 feet) and arguably any walking I did speaks more to my skill or fatigue than the trail. I will say that the direction of travel is important as far as the amount of walking you do, particularly the climb and descent of Whitehorse and Cathedral.

Here is some of the details with a map. I broke up the trip into legs with times and other data. I also color coded the map and the data so that the black is paved, the brown is gravel, and the bright blue and light blue are single track. The color coding is both on the map and the data. I have also included a .gpx file and .kml file for you if you want to put either of them into a mapping program.

West Side Data
West Side Map (This is a Geopdf)
West Side .gpx File (Some browsers add a .xml extension, delete the .xml leaving only the .gpx extension before saving)
West Side .kml File

Posted by Marc Chauvin in Maps, Mountain Biking

Mountain Biking -–––> Mapping -––––> Python

In the last two months I started to learn how to write Python code. For me to learn I needed to simultaneously take an online course and work on a project that motivates me. When I started working on this I figured I might get something done in 6-8 months. Fortunately I wrote a program that is very useable for me. The Python journey started because of maps and maps got started because of climbing, skiing and mountain biking.

The other day I did a fun ride over in the Black Cap area here in North Conway. The ride I did was up Hurricane Mountain Rd, onto the Black Cap Trail to the Cranmore connector, down the Hurricane Trail to the Red Tail, up the Red Tail back to the connector, down the connector to Kandagnar,  down that and back to the start. 

I ran a track while I went on my ride and when I got home I used my new program to break it up into legs. The program allows me to break it up anyway I would like and then it gives me data like speed, time, Munter pace, elevation gain and loss, along with other data. That is the function of the program is that after the fact I can get data for any section. Here is how it come out of the program .txt file . Below is a cleaned up version that took me a few minutes in Word to make it more readable.

Click here the map for a geopdf map.                                                                                                                                                     Click here for the .pdf trip plan

Posted by Marc Chauvin in Maps, Mountain Biking

Gran Paradiso Digital Map

The first time I guided the Gran Paradiso I was surprised at the maps I could get. I couldn’t find any digital maps of the area beyond the TF Outdoors layer you find in Caltopo and other apps, and the paper maps were vague. One of the things I wanted to do as I learn to make maps is to work on areas that are not very well covered. My goal is to progress in the quality so if I start with areas that are poorly covered my early maps might still be useful. I also wanted to pick areas that get a fair amount of traffic so the Gran Paradiso fit that bill.  The map is still a work in progress but I have made some advancements since my last post on maps. I am now not just able to put a map on Caltopo but I am putting layers on so I can adjust the opacity to create the look that best suits the needs of the user. Below is a video I made to show you the result. My next goal will be to configure an off site server that is more permanent than my current system which should speed up the rendering and make the layers available all the time.


Posted by Marc Chauvin in Climbing and Avalanche Education, Maps

New Caltopo Layer Patagonia

New Caltopo Layer Patagonia

For those that are wondering what I’ve been working on this is how you can use my maps on Caltopo now that I have a WMS server

If you want to make a .KMZ file from the layer make your base layer TF Outdoors then Stack the Custom Layer (Patagonia) at 100% over that, otherwise you’ll get an error.

Here is the link you need to paste into Caltopo that I mention in the video.

http://45.63.67.37:8080/geoserver/Patagonia/wms?SERVICE=WMS&?SERVICE=WMS&VERSION=1.1.1&REQUEST=GetMap&STYLES=&BBOX={left},{bottom},{right},{top}&WIDTH={tilesize}&HEIGHT={tilesize}&BGCOLOR=0xCCCCCC&FORMAT=image/png&EXCEPTIONS=application/vnd.ogc.se_inimage&SRS=EPSG:3857&LAYERS=PatagoniaforGE


Posted by Marc Chauvin in Maps, Mountain Biking

Gooseberry Mesa MTB

Gooseberry Mesa was my first ride on slickrock ride. The trailhead for the mesa is located just outside Hurricane UT about 2hr 45min from Las Vegas and 4hrs 45 min from Salt Lake City.  On the Mountain Bike Project website they say: “Gooseberry Mesa is 
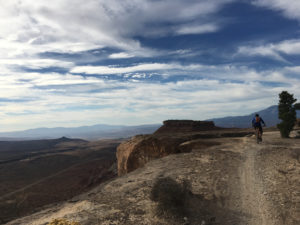
a world class trail. It’s one of the best technical trails anywhere with rolling slickrock, twisty singletrack, and vistas to die for.” With that kind of description we had to go there and do some riding.

My trip started with a flight to Salt Lake City for an American Mountain Guide Association meeting. There I met with Rob Coppolillo and after the meeting we drove to the trailhead. We started the ride just after 3pm, pretty late for October 30th. So Rob and I started by doing the South Rim Trail then Hidden Canyon finally the Secret Trail back to the car. The ride we did was 17.5 miles long which took us 3hrs and 45 min to complete. We finished the last 20 minutes by headlamp.

The riding was cross country style and although there isn’t any real up or down the trails go over rough rolling terrain so there are short technical ups and downs throughout the ride. Instead of trying to describe the riding here are a few videos to give you a taste.

As per usual here is the geopdf map, gpx, and kml file so you can have the navigation info for the area. The map is is from utahmountainbiking.com and I geo referenced it onto Caltopo so you can import it into Avenza and have it sync with your phones gps and you’ll get a blue dot at your location.

Gooseberry Map 

Gooseberry Map KMZ

Gooseberry GPX of our ride
(Some browsers add a .xml extension, delete the .xml leaving only the .gpx extension before saving)
Gooseberry KML of our ride


Posted by Marc Chauvin in Maps, Mountain Biking

Ben Macdui via Faicaill Ridge Scramble with a Descent into Lairig Ghru

During my vacation to Scotland with my wife Jane, I took a day to do a little solo mission.  We had been hiking and climbing a lot 
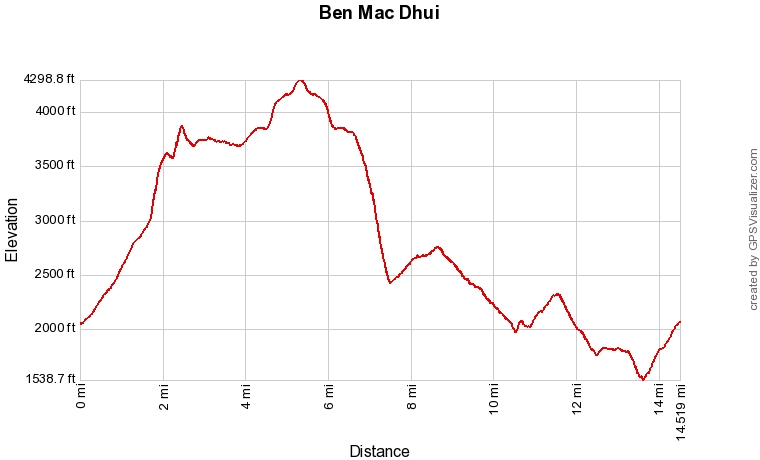
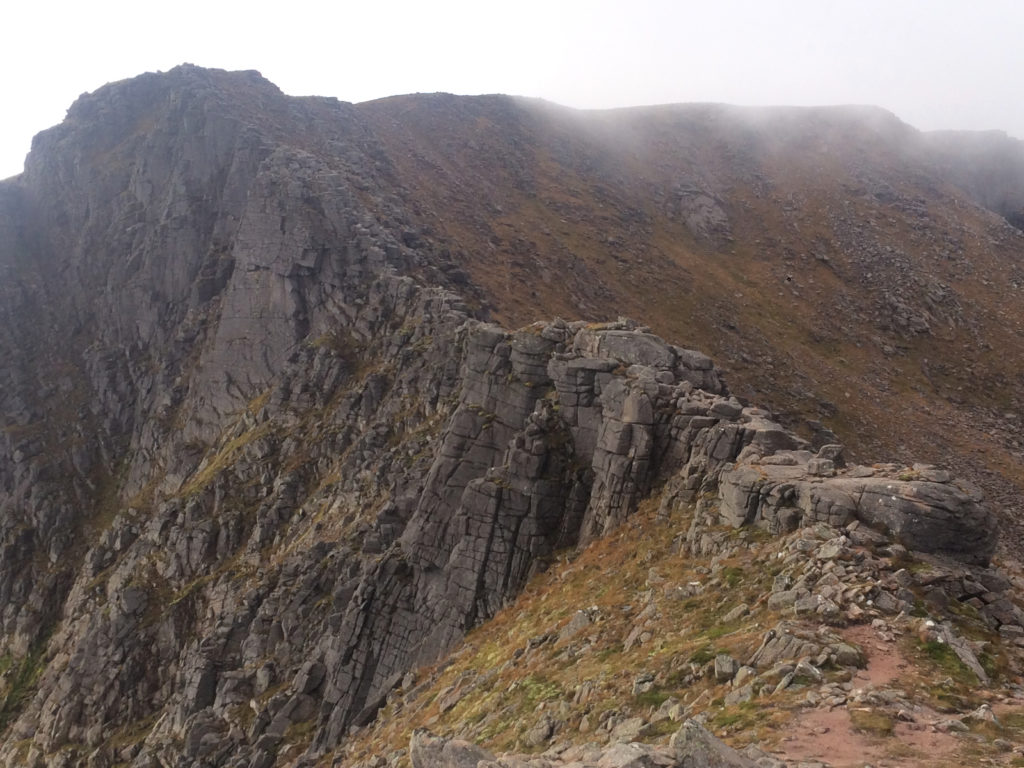
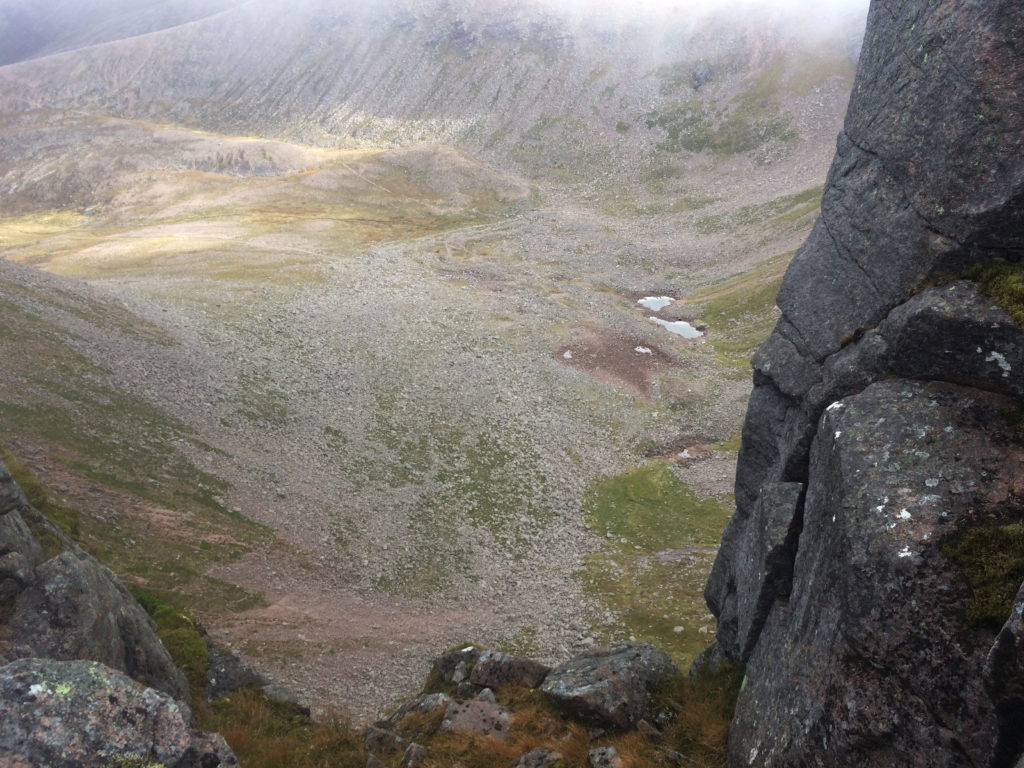
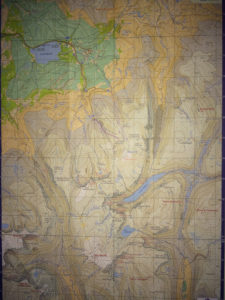
and the weather was marginal with wind in the forecast.  Jane decided to take the train to Inverness while I went on a hike with a short scramble in the Cairngorm. I wanted to do the Faicaill scramble and summit Scotland’s 2nd highest summit, Ben Macdui.  The night before a friend had commented on Facebook that we should try to get into a picturesque valley to the west of Ben Macdui called Lairig Ghru.  The problem was there was no trail down from Ben Macdui to the valley. After a little research and a short discussion with someone at Glenmore Lodge it seemed going “cross country” down was reasonable. Below is a video of my route I made on Google Earth with a .kmz map overlay of the area. At the end of this post there is the .gpx .kmz and .kml files and a geopdf of the route.


Here is a profile of the route

The route starts at the ski area and heads toward the Coire an t-Sneachda, a ravine on the side of Cairn Gorm. From partway into the coire I headed up toward the ridge. Again, some info I got at the Glenmore Lodge helped here as they told me about a short scramble getting up to the ridge that made gaining it more fun, it is a variation to the Faicaill called the Twin Ribs. From there I hit the main scramble, below is a picture of the Faicaill.

The scramble was short and pretty easy, I’d rate it mostly 3rd class with a short section of 4th class. Below is a picture looking down the crux.

Looking from the ridge into the Coire an t-Sneachda.

Once at the top of the scramble the trail to Ben Macdui is pretty straightforward. Having said that it is on a very nondescript plateau feature which was in the fog as I walked it.  The trails are pretty well worn but there are no trail signs that I saw.  On my way I saw two groups going the other way both of which asked me to confirm that they were headed toward the ski area.  Having made a map that was geo-referenced on my phone gave me the confidence and simplified my navigation allowing me to move quickly through the terrain.  In no time I found myself at the top of Ben Macdui.

From the top of Ben Macdui I backtracked a little over a mile to where the track splits.  This junction was very hard to see if you weren’t paying attention and knew from the map that the trail spilt. I had heard that the Cairngorm can be a navigation challenge particularly in winter when the trails would be invisible and the fog created a true whiteout. Even in the summer it shouldn’t be taken lightly in a fog. At the split I started to head on my cross country section and in a few minutes I dropped below the fog and got a view of Lairig Ghru. Below is a picture looking south as I descended out of the clouds.

The cross country descent was reasonable consisting of a steep grass and heather slope. The going was slow as I picked my way down and my knees felt the descent but otherwise it was uneventful.  The views of the valley were spectacular and although I saw a party in the valley as I descended they were gone once I got to the bottom, I had the Lairig Ghru to myself.  At the base of the valley was a good trail but I was still more than 7 miles away from the car.

From the valley the walking is pleasant with not too many ups or downs. You climb a bit getting out of the valley then make your way to the Chalamain Gap. After the gap the trail gets much better as it makes its way back to the carpark.  Below is a picture looking back toward Chalamain Gap about a mile from the car.

As promised here is the navigation data for the trip.

.KMZ File
.KML File
Ben-Macdui GPX (Some browsers add a .xml extension, delete the .xml leaving only the .gpx extension before saving)


Click picture for geopdf

Posted by Marc Chauvin in Climbing and Avalanche Education, Maps

Ben Nevis via Tower Ridge

My wife Jane and I went to Scotland for a vacation and we had the luck of having two really good weather days in Fort William. We used that luck to climb the classic Tower Ridge on the North side of Ben Nevis. This is a classic hard scramble/climb.  The ridge straddles the line between a scramble and a climb, I would rate it about 5.2/5.3 and alpine grade II. For those familiar with Cascade Routes it’s harder than the chimney section of the Fisher Chimneys but easier than the West Ridge of Forbidden. I carried a light rack of 3 Tri Cams (.5-2), 6 nuts, a few slings, a cordellette, and a few locking carabiners.  I took a 40m rope but a 20m/30m would have been fine but might have made retreat difficult. In the end I used only 3 placements as I was able to use horns the whole way and although I might still bring a light rack if I were to guide it the horns on the route could be used exclusively with a good eye for the terrain.

Here is a video I took of the ridge from the summit.

Of course I also have all the navigation data that you can download. Here is another video of a map overlaid on Google Earth using the .kmz file that you can download below.


Now for the navigation files:

Click for the data you want
.GEOPDF

.KML File

Tower Ridge GPX
(Some browsers add a .xml extension, delete the .xml leaving only the .gpx extension before saving)

.KMZ File

Jane halfway up the Tower Ridge on Ben Nevis

Posted by Marc Chauvin in Climbing and Avalanche Education, Maps